 |
| What I like about LuxCoreRender version is how good it does the caustics, and how incredibly realistic glass is. |

Sunday, November 11, 2018
Back to LuxCoreRender
I've been using Cycles for my rendering jobs almost exclusively for a number of years now. In the past, when I wasn't happy with Blender internal renderer, I had tried Luxrender, but gave up on it when Cycles came out. I recently re-discovered Luxrender, which is not called that anymore, but LuxCoreRender, and it is really really good. Almost to the point of making me want to switch to it from Cycles. For one thing, it does caustics like a breeze, and it has a very solid material node workflow. So, I re-created an old scene of mine in LuxCoreRender, and it did not come out half bad. Click here for the Cycles version. Enjoy!


Monday, November 5, 2018
Resetting a Node to its Default Values in Blender
I just stumbled by accident on this very useful Blender tip, and I thought it would be worth sharing. It's very simple. Let's say you have a node in the Node Editor and that you edited its multiple values into an unrecognizable form not resembling the original state of the node. Instead of creating a new node of the same kind, if all you need is to reset its values to the default settings, just press the Delete key. Enjoy!
 |
| Figure 1. In this example, the Carpaint Material from LuxCoreRender has been rendered into an unrecognizable form. How do you go back to the default settings, then? |
 |
| Figure 2. Just press Delete on your keyboard. The node reverts to its default values, as shown here. |
Wednesday, January 4, 2017
Transforming Proportionally in the Properties Panel
Today I'm sharing a quick tip on how to transform an object's location, scale and rotation proportionally on the three axes from the Properties panel. Of course, there are other ways to do this. For example, you can use the 3D gizmo, click and drag on the center circle. Or you can just enter the needed transform shortcut (G, R, S) and enter a numeric value for a proportional edit. However, I find many times it is very convenient to enter numeric values in the Transform fields in the Properties panel (figure 1). To access the Properties panel, press the N key in the 3D Viewport.
Let's say you want to scale the default cube to 1.27 on the X, Y, and Z axes, in the Properties panel. All you need to do is click and drag down on the desired values you want to affect (figure 2). Then, enter the desired numeric value, press Enter, and you're done. The three fields will reflect the change. Enjoy!
 |
| Figure 1. Press N to access the Properties panel. |
Let's say you want to scale the default cube to 1.27 on the X, Y, and Z axes, in the Properties panel. All you need to do is click and drag down on the desired values you want to affect (figure 2). Then, enter the desired numeric value, press Enter, and you're done. The three fields will reflect the change. Enjoy!
 |
| Figure 2. Click on the X field, drag down to include the other fields in the editable field selection. |
 |
| Figure 3. The topmost field is highlighted. |
 |
| Figure 4. Enter the desired value. All fields reflect the change. Press Enter when done. That's it! |
Thursday, November 3, 2016
Using Blender in 3D Printing
So, I've had this blog pretty much abandoned for a bunch of months, and I feel bad and all, but there's a reason for this, which is, for the past year I've been very busy working at a new 3D printing company in Barcelona, called Buy3D (here's the link to our website). I've been using Blender extensively at work, from fixing meshes to applying colors (yes, it is color 3D printing), checking for errors, generating new designs, you name it. Blender really does a good job when it comes to 3D printing capability. It's not as powerful as some of the high end software (Materialise Magics), but it can definitely be used in a wide range of applications. In the next few entries, I will share some of the hard-earned knowledge I've been gaining. So, stay tuned!
 |
| An interpretation of a painting by Magritte, designed entirely in Blender, and 3D printed with a 3D Systems ProJet 660Pro machine. |
Wednesday, April 15, 2015
New Mexico Sunset
Here is a new digital painting I've been working on. I love those New Mexico colors...

Wednesday, March 4, 2015
Announcing New Blender Book: Creating Diamonds in Blender
Over the past few months I have been working on a new Blender book, and finally it's out! So, I am officially announcing the release of my first book on Blender, Creating Diamonds in Blender! The book is available in the Apple iBooks store and in Amazon in electronic format—a true e-book, not a PDF. Shortly, the book will be available for print on demand.

The book is organized into a series of step-to-step tutorials geared for beginning Blender users. In the book, I cover basic modeling techniques, a bit of interface customization, hot key workflow, camera, lights, scene background, simple particle systems, and of course, material creation with Cycles. Additionally, there are two medium to advanced tutorials that deal with applying random colors to a material, and learning the basics of compositing. The core, and the inspiration really, for this book centers around creating a diamond material that produces believable color dispersion. For those interested, here is an excerpt from the book explaining what color dispersion is:
Here is the introduction to the book:
Here is the table of contents:
The book is organized into a series of step-to-step tutorials geared for beginning Blender users. In the book, I cover basic modeling techniques, a bit of interface customization, hot key workflow, camera, lights, scene background, simple particle systems, and of course, material creation with Cycles. Additionally, there are two medium to advanced tutorials that deal with applying random colors to a material, and learning the basics of compositing. The core, and the inspiration really, for this book centers around creating a diamond material that produces believable color dispersion. For those interested, here is an excerpt from the book explaining what color dispersion is:
“Color dispersion comes from different wavelengths of light refracting at different angles. The compounded refraction produces rainbow effects inside the objects, and on the caustics as well. Figure 1 shows an example of dispersion.”
 |
| Figure 1. Diamond is clear, but the refraction variance for different wavelengths produces the colored highlights observed in this image. Brillanten, by Mario Sarto - Self-photographed. Licensed under Creative Commons Attribution Share Alike 3.0 via Wikimedia Commons |
“The goal of this tutorial is to provide an introduction to modeling, material creation, and rendering in Blender. By the end of it, you will have created your first render in Blender. You will also be learning about include lighting, setting up a camera for rendering, and the basics of color correction and special effects. This is a beginner’s tutorial, so I am assuming a very basic knowledge of Blender, namely, how to select objects (Right-click by default) and how to navigate inside the 3D Viewport: zooming, orbiting, and panning. Figure 1 shows what the final image will look like:
Figure 1. Final result of the tutorial

For the material creation and rendering part of the tutorial, we will be working with Blender’s main render engine, Cycles. When Cycles was introduced a few years ago, it promised to become an alternative to Blender’s internal renderer, which had become outdated. Nowadays, it is a fully supported and upgraded tool, with new features being added constantly. Many commercial projects have already taken advantage of Cycles. Learning Cycles, therefore, is no longer optional—it is essential.
A while ago, I became intrigued about color dispersion in glass. I have always loved rendering glass. There is something about the refractive and reflexive chaos inside glass that I find very appealing. Color dispersion can be seen in those rainbows that appear in glass and water when light hits them directly. It is essentially light of different wavelengths being bent at different angles. Some physically based render engines incorporate color dispersion internally, but Cycles does not. So, I set out to see if I could fake color dispersion in Cycles. I tried achieving this effect in several ways, and in the end I settled for the setup I present in this tutorial. I hope that, beyond its usefulness as a material, by going though the necessary steps to create it, you will learn a few things about Blender and Cycles, and be able to apply that knowledge to your own projects!”
Here is the table of contents:
- Modeling a Diamond
- Putting the Scene Together
- Creating the Diamond Material
- Rendering the Scene
- Appendix I: Coloring the Diamonds
- Appendix II: Compositing
Also, here are a few screenshots from the book:
 |
| From the Appendix II: Compositing |
 |
| Introduction |
 |
| From chapter 1, Modeling a Diamond |
 |
| From chapter 2, Putting the Scene Together |
 |
| From Appendix II: Coloring the Diamonds |
Monday, December 15, 2014
Estelades and Progressive Refine in Cycles
For a while now, I've been wanting to create an image that would showcase some fun, alternative designs of the Catalan pro-independence flag—known as estelada. The image I came up with is pretending to be a natural-history museum kind of display of lapel pins typically worn by pro-indy folks—although this practice used to be more common back in the seventies than it is nowadays. I was inspired by a friend's piece of individual cereal bits displayed in a similar manner.

Coincidentally, while I was rendering this piece, I noticed something funny going on with the Progressive Refine mode. I have this app, called iStat Menus, to control CPU usage and temperature, and adjust fan speed accordingly. Anyway, I noticed a cyclical fluctuation in CPU usage and temperatures when using the Progressive Refine render option. The final image had a resolution of 1500x1200 pixels, and since I do not own a super-duper computer, this is quite a large scene for me to render. The cyclical fluctuation was happening coinciding with each sample being rendered. During rendering, CPU usage would shoot up, and the CPU would slow down in between samples. This rendering mode, I think now, is a good choice for those who are worried about burning out their CPU during rendering. Good find :)
Friday, November 28, 2014
Controlling Texture Tiling in Cycles
A couple of years ago, I wrote a small tutorial on how to apply one or more textures as decals to one single mesh in Cycles. The technique back then took advantage of using several UV maps fed through the Attribute node. Today, I am revisiting this topic because it is perfectly possible to apply one or more images to mesh in Cycles with total control over scale, rotation, position—and more importantly, tiling. Let's see how this is done.
Open up a new Blender file, get rid of everything, and add a plane. Press 7 to switch to top view and Shift-C to center the view on the plane. I like to work on Orthogonal view, but that's me. Create a material for the plane. Split the window to have access to the Node Editor. In the 3D Viewport, switch to Rendered shading mode. Now, with the plane selected, go into Edit mode, select all, and press U to UV unwrap the plane with the option Project from View (bounds).
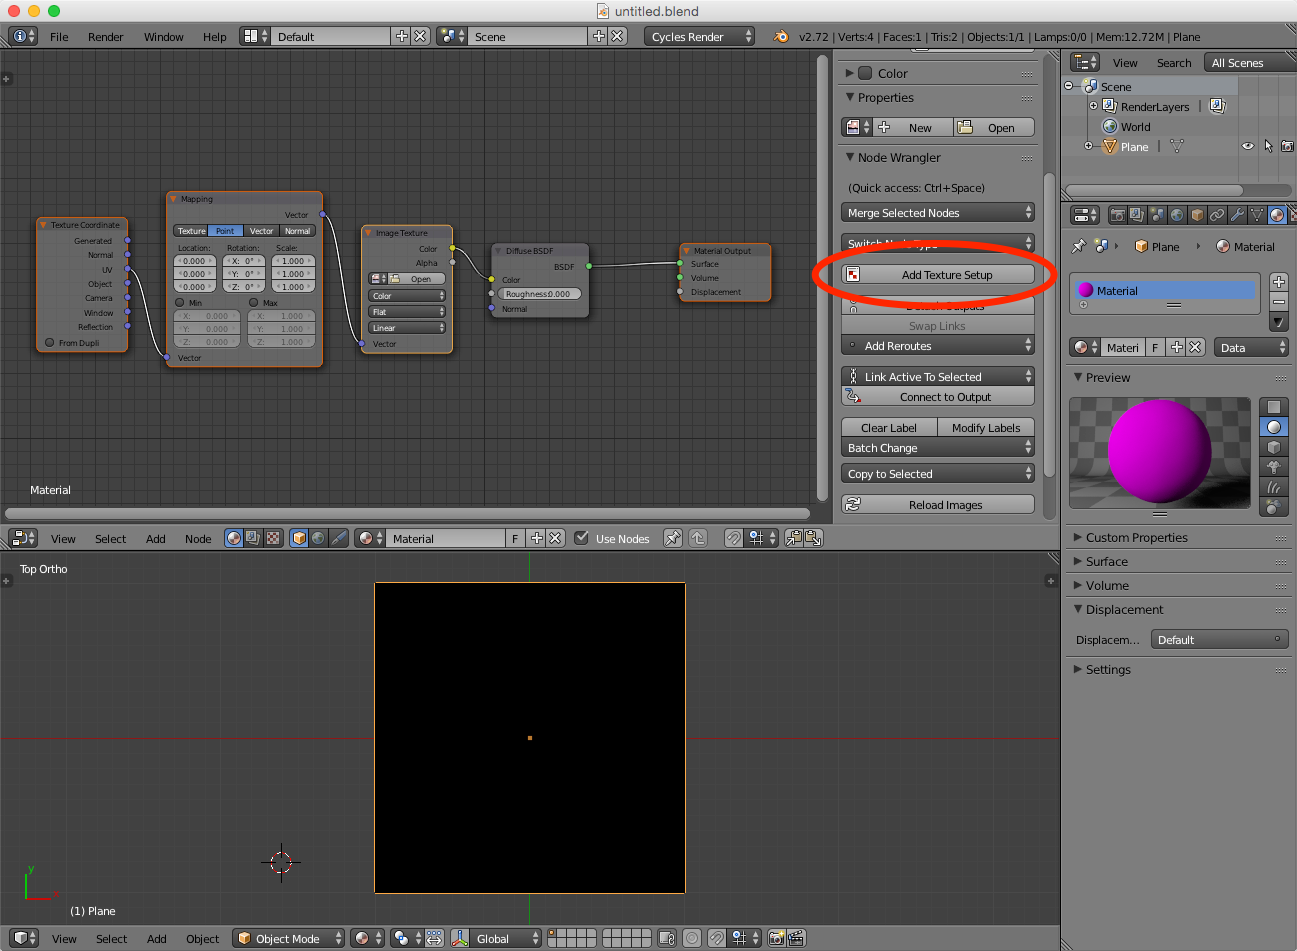
Now, make sure you have the Node Wrangler addon activated. In the Node Editor window's Properties panel, click on the Add Texture Setup button. This adds a Texture Coordinate, Mapping, and Image Texture nodes and connects them to the existing Diffuse node (Figure 1).
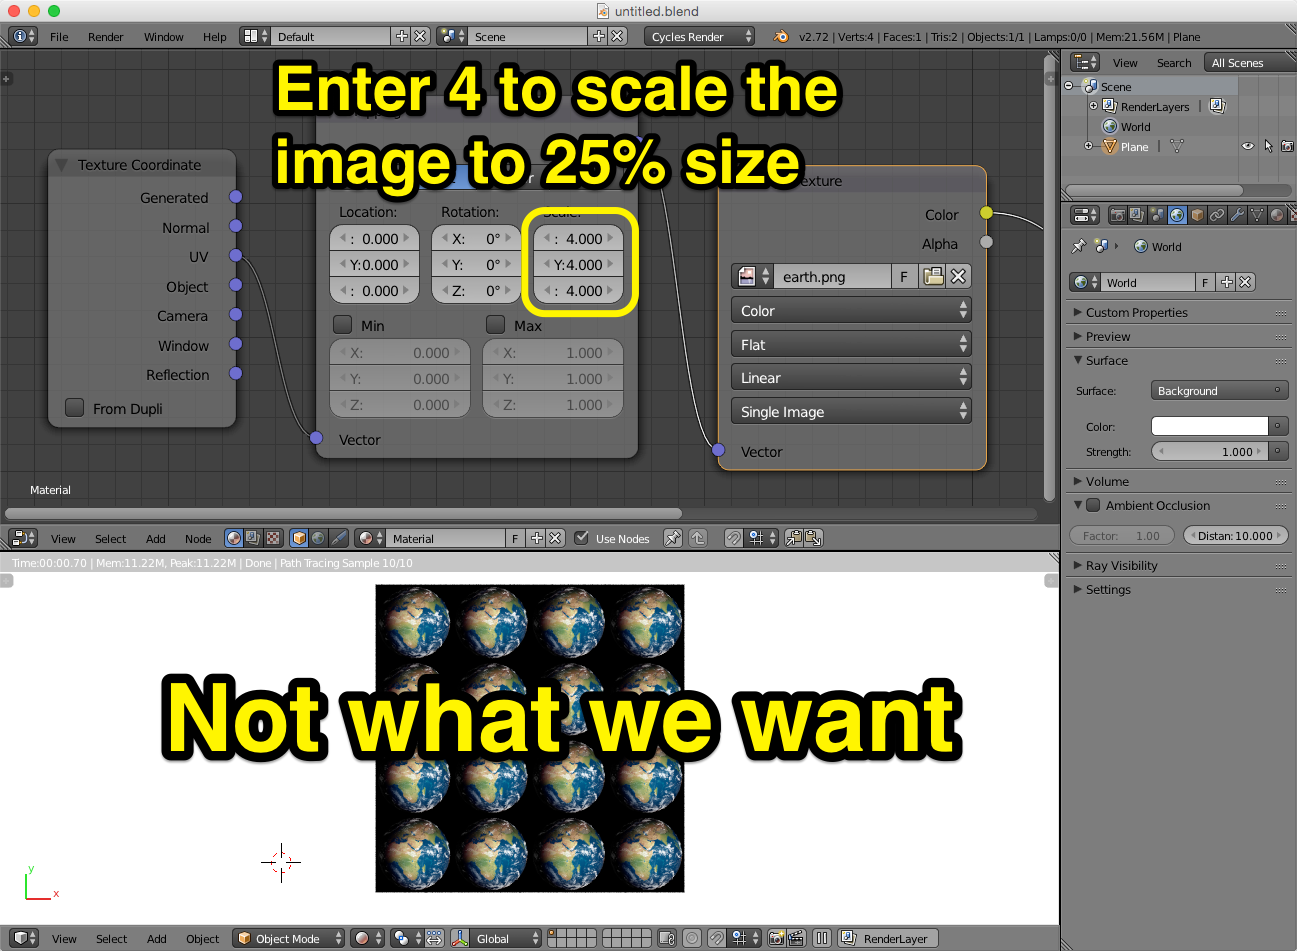
Now, I'd like to scale this image down to 25% and place one single instance of it—that is, without tiling it. However, when you change the scale in the Mapping node, the image becomes tiled! This is not what we want. Notice I am using the Point option in the Mapping node, which alters the projection itself, not the texture. To scale down the image to 25% size, you need to enter a 4 (Figure 3).
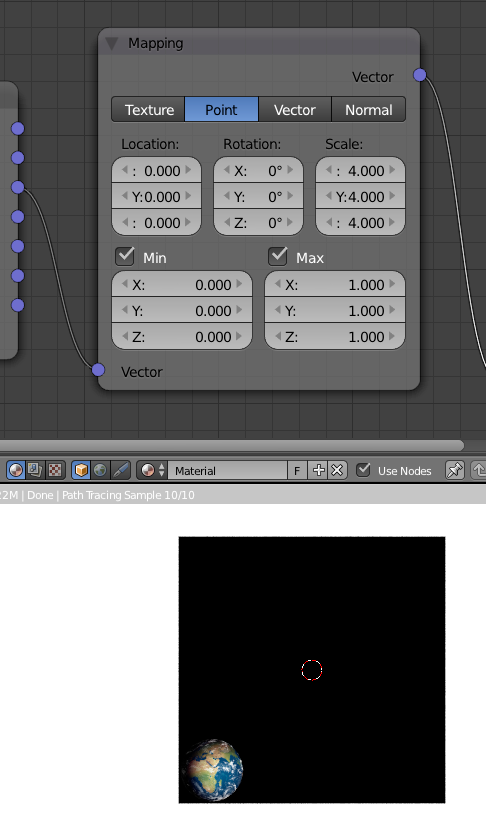
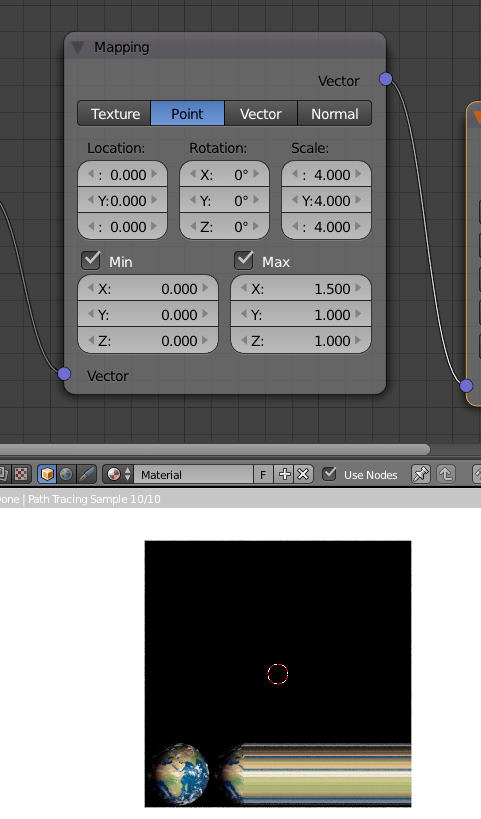
So, how do we stop the image from tiling? It took me a while to discover, but you do it by checking the Min and Max options, and entering the appropriate values. What does Min and Max mean? Min and Max control how a texture tiles over the XYZ axes, so the Min and Max value refer to dimension units in the texture coordinate. Check these two options and see what happens! The image texture stops tiling at the maximum coordinate value assigned under Max—which is one, so the tiling stops at 1 (Figure 4). If you enter non-integer values here, you'll get a bit of a tiling stretching over the remaining geometry in that axis. Blender simply extends the pixels at the texture's edge (Figure 5).
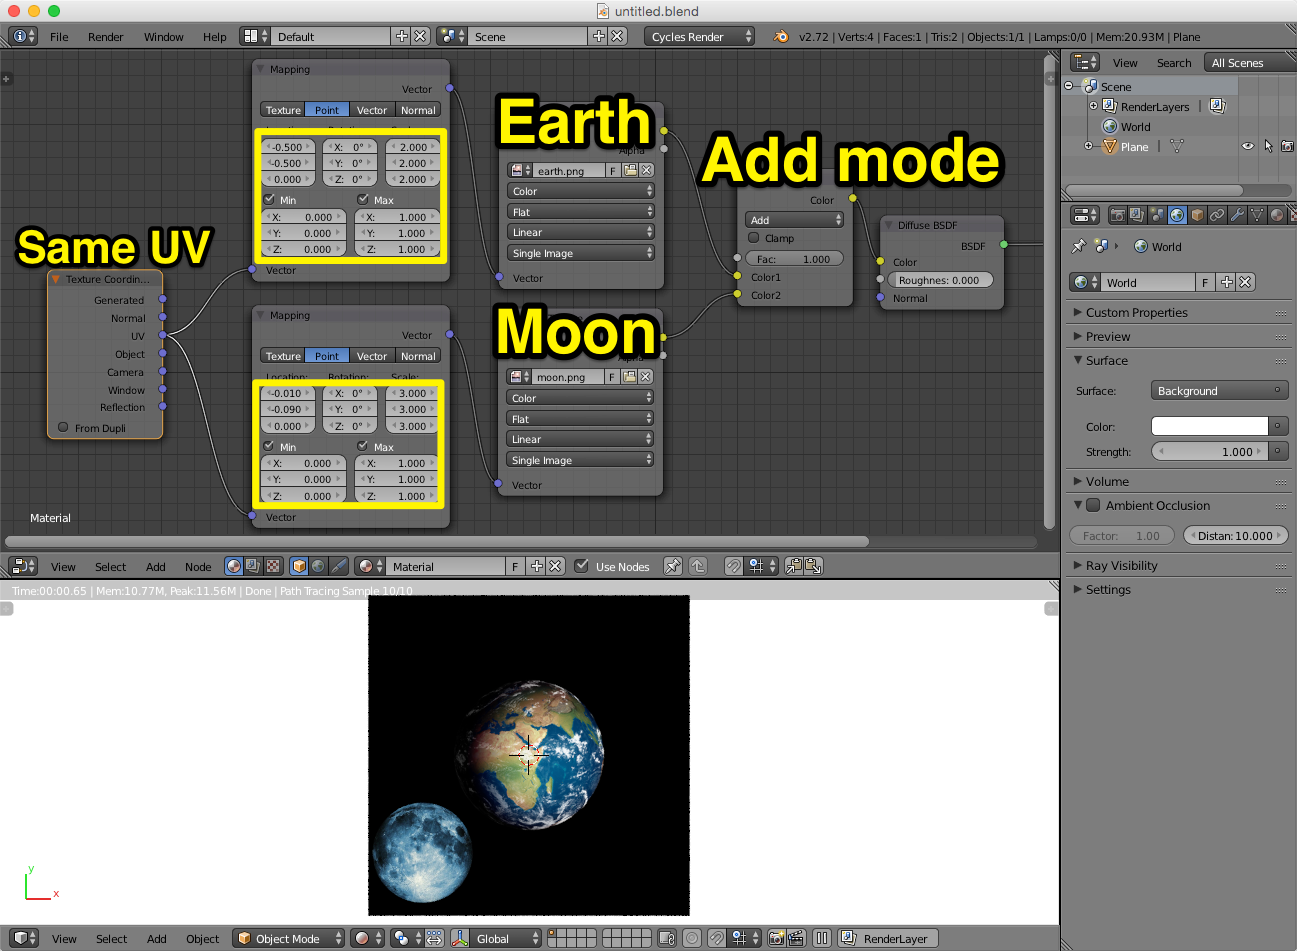
OK, so we can stop an image texture from tiling over the whole UV projected mesh. This is actually great news for decal professionals in Blender. What about adding a second image texture to the same mesh without using a second UV map? Piece of cake. Image 7 shows the noodle I am using. I am simply using a different Mapping node for the second image (the moon). For this example, I am mixing the two textures with the Add mode. Also, it is important to combine colors of different image textures before plugging the color info into a shader node. Combining color info at the shader level becomes more restrictive, because we lack certain mixing modes for shaders.
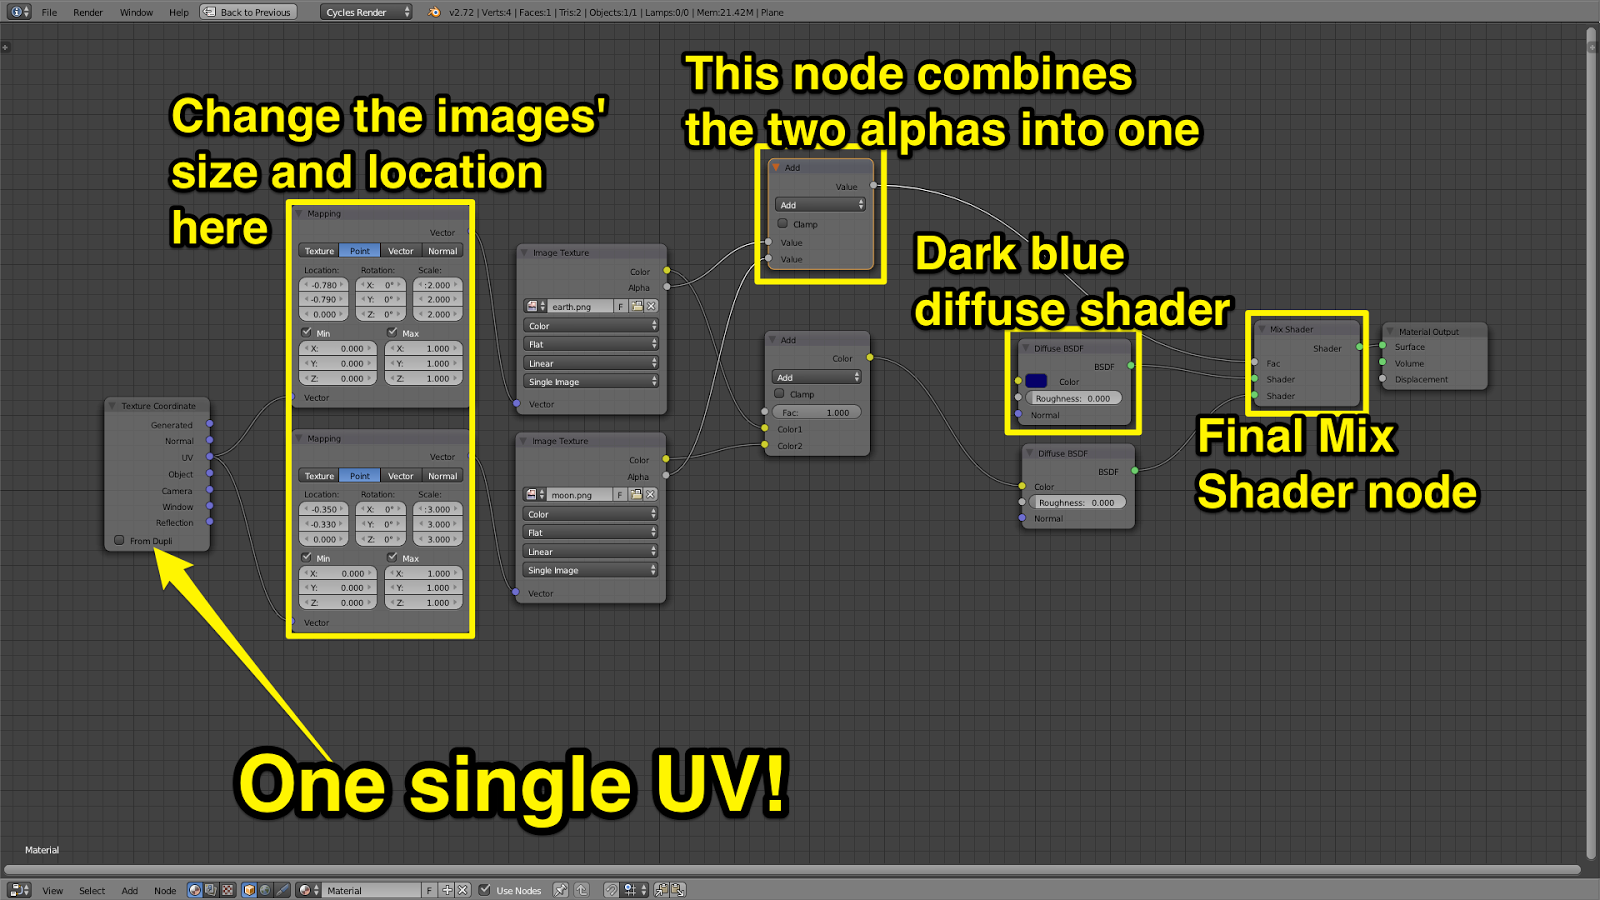
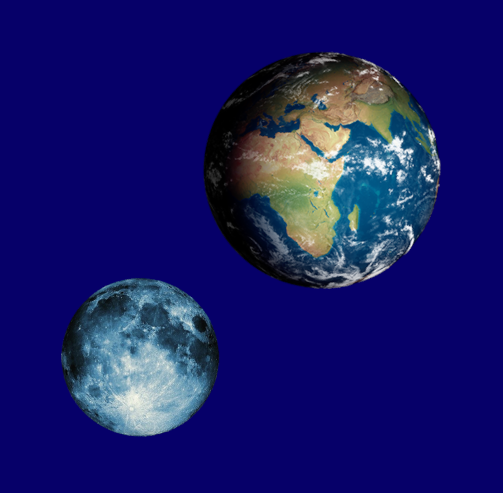
Let's take this one step further. I want the plane to be dark blue, and I want to place the earth and the moon on top of it as if they were bumper stickers. For this, I will use the alpha information from the texture images themselves, I will combine them into one grayscale image, and this will control the mix between two shaders—one with the earth and moon, the other, dark blue. Image 8 shows the final node setup.
Open up a new Blender file, get rid of everything, and add a plane. Press 7 to switch to top view and Shift-C to center the view on the plane. I like to work on Orthogonal view, but that's me. Create a material for the plane. Split the window to have access to the Node Editor. In the 3D Viewport, switch to Rendered shading mode. Now, with the plane selected, go into Edit mode, select all, and press U to UV unwrap the plane with the option Project from View (bounds).
Now, make sure you have the Node Wrangler addon activated. In the Node Editor window's Properties panel, click on the Add Texture Setup button. This adds a Texture Coordinate, Mapping, and Image Texture nodes and connects them to the existing Diffuse node (Figure 1).
 |
| Figure 1 |
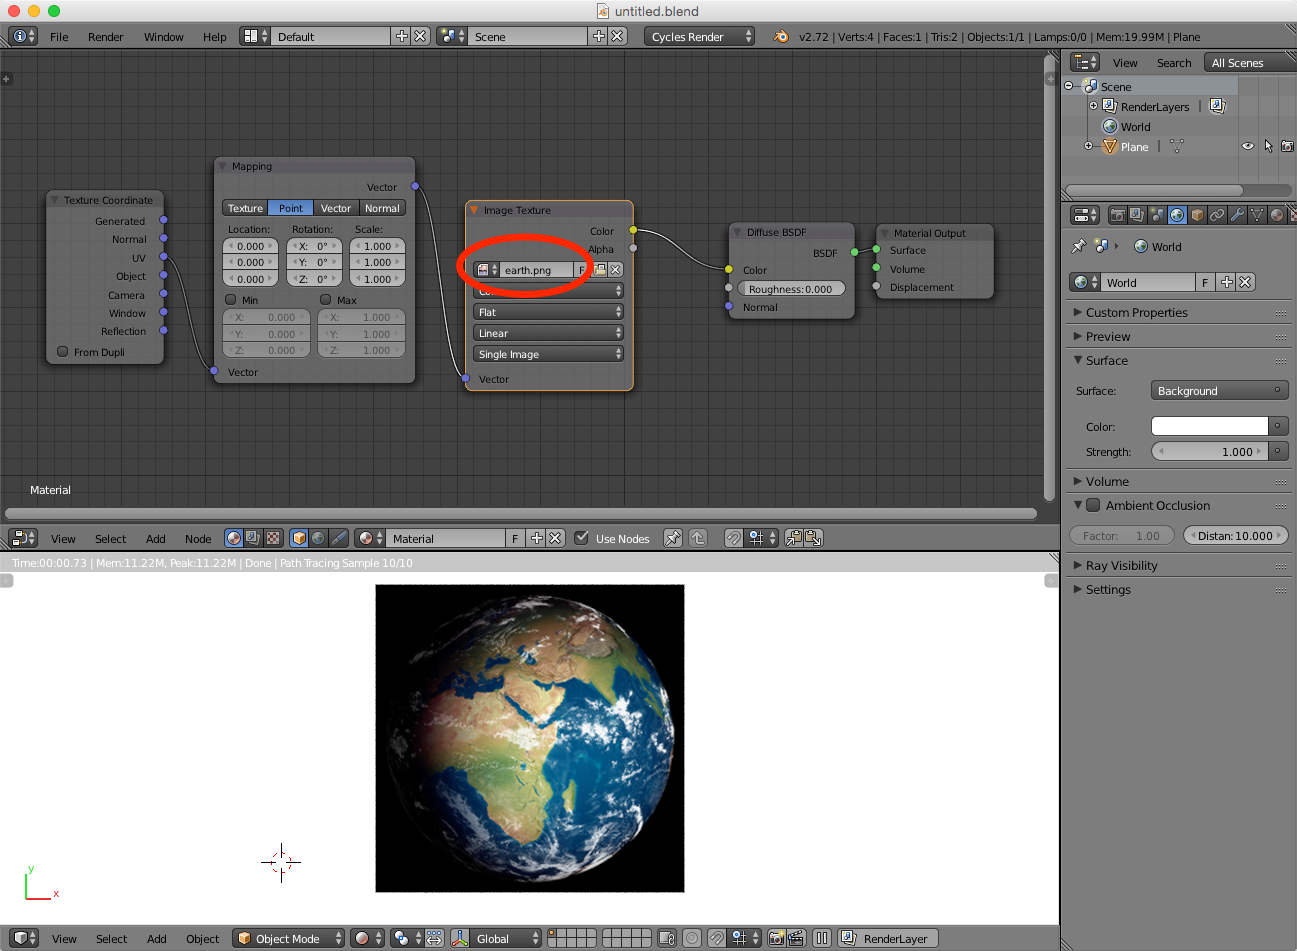
Now you need to choose an image texture in the Image Texture node. I am using a free image of an earth I found on Pixabay. The image I used is a PNG with a transparent background (Figure 2).
 |
| Figure 2 |
 |
| Figure 3 |
 |
| Figure 4 |
 |
| Figure 5 |
I'd like to scale the earth to 50% its original size, and place it in the center. There are several ways to do this with the mapping node. I find that using a 2 scale in Point mode, and changing the X and Y location to -0.5, as seen in Figure 6, works well enough.
 |
| Figure 6 |
 |
| Figure 7 |
Let's take this one step further. I want the plane to be dark blue, and I want to place the earth and the moon on top of it as if they were bumper stickers. For this, I will use the alpha information from the texture images themselves, I will combine them into one grayscale image, and this will control the mix between two shaders—one with the earth and moon, the other, dark blue. Image 8 shows the final node setup.
 |
| Figure 8 |
 |
| Figure 9 |
Wednesday, November 26, 2014
Aligning Geometry to World Axes in Blender
Oftentimes, I have been puzzled by Blender's apparent lack of capabilities regarding work planes (this is not entirely true—see Update at the bottom of the page). A work plane, as defined in other programs such as modo, lets us change alignment of the global XYZ axes momentarily in order to edit a mesh in a more comfortable way. In this post I am sharing my own workaround in Blender to align any object to any work plane, with one condition—the work plane needs to be represented by some mesh element. An example will make this more clear.
Open up a new Blender file and delete everything. Press 5 to go into Orthogonal view. Add a Sphere. Now, go into Edit mode, switch to Face mode, and select a random face (Figure 1). We will realign the whole sphere so this face ends up squarely aligned to the world axes.
Blender has a set of view alignment commands that align the view to any selection within a mesh. The alignment can be to the top, bottom, front, back, right, and left of a selection (Figure 2). The keyboard shortcuts for these alignment commands are the same as the ones used for standard views, but with the Shift key added. So, if Numpad 7 is used to switch to top view, Shift-Numpad 7 is used to align the view to the top of a selection. Press Shift-Numpad 7 now to align the 3D Viewport to the top of the selected polygon (Figure 3). Press Shift-S and choose Cursor to Selected to place the 3D cursor on the selected face.
Update: Right after I published this post, Eriandor left a comment with a link on creating custom transform orientations. I did not know, or remember, this feature existed. I think now custom transform orientations might offer a better, less cumbersome workflow in many cases. Thanks Eriandor! Here is the link.
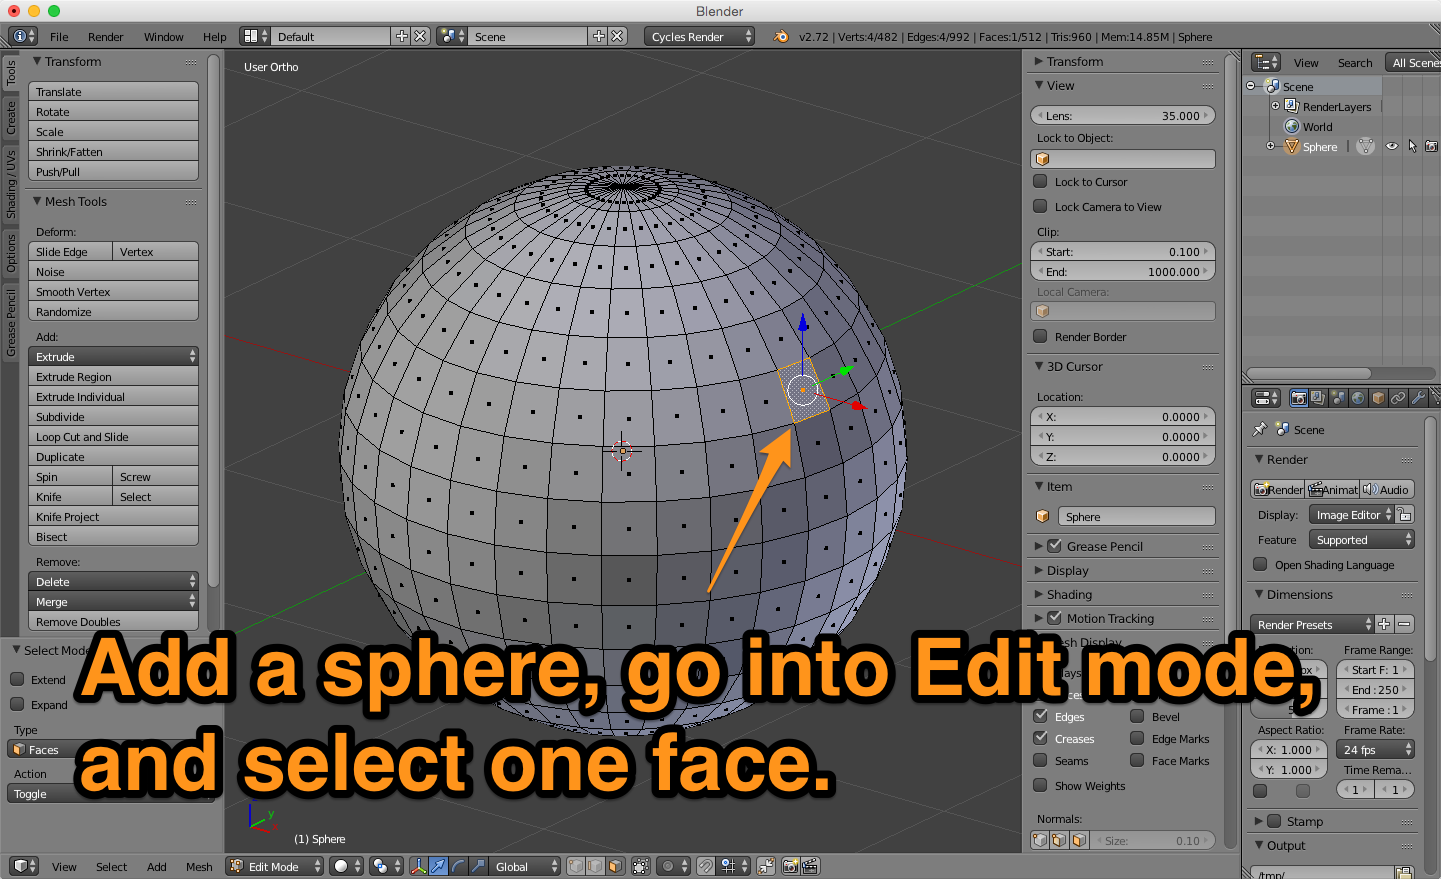 |
| Figure 1 |
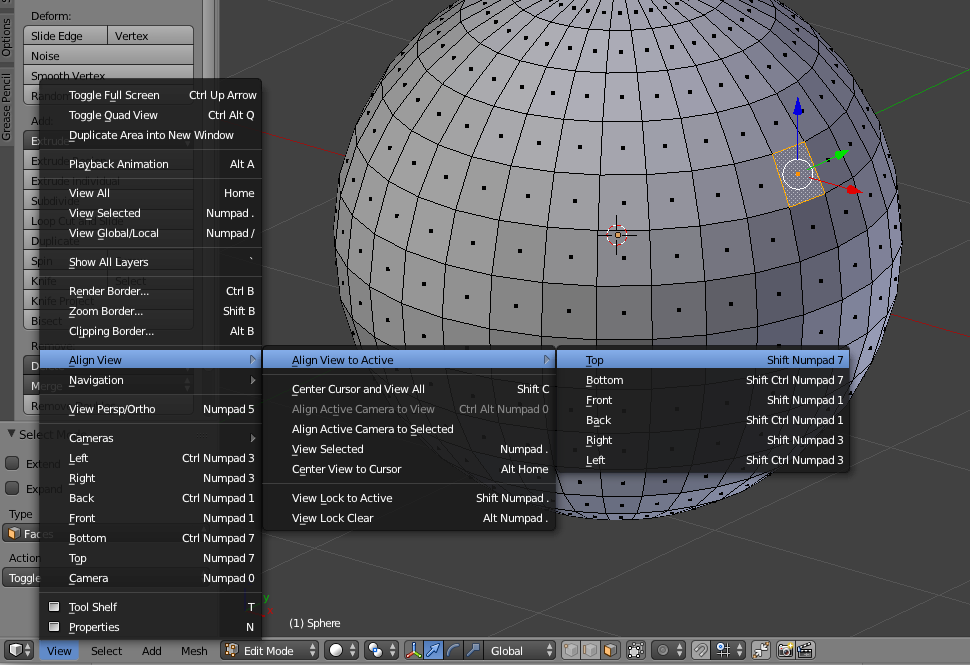 |
| Figure 2 |
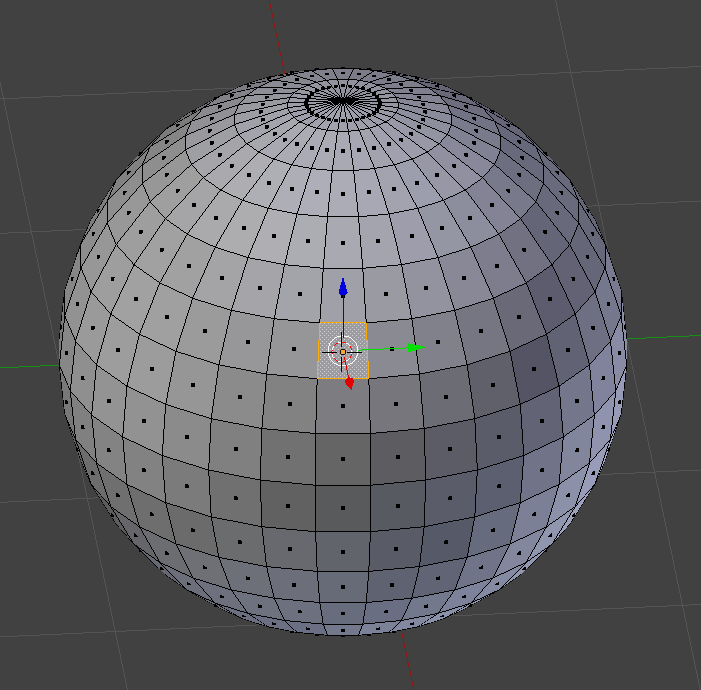 |
| Figure 3 |
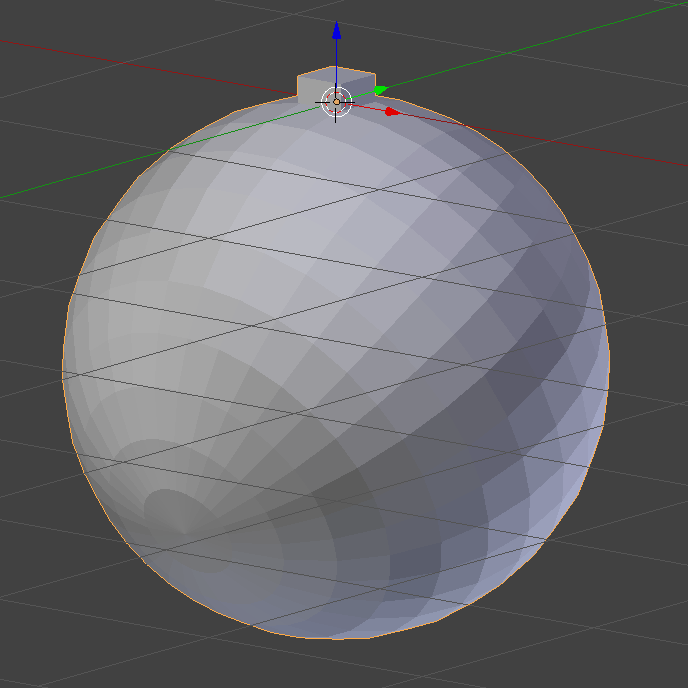
Press Tab to go into Object mode. Making sure not to change the 3D View, press Shift-A to add a Cube. In the Tool Shelf options for the newly created cube, enter 0.1 for Radius, and check the Align to View option (Figure 4). The cube is placed exactly in the precise location where the selected face sits. You can rotate the view to check this is so (Figure 5).
 |
| Figure 4 |
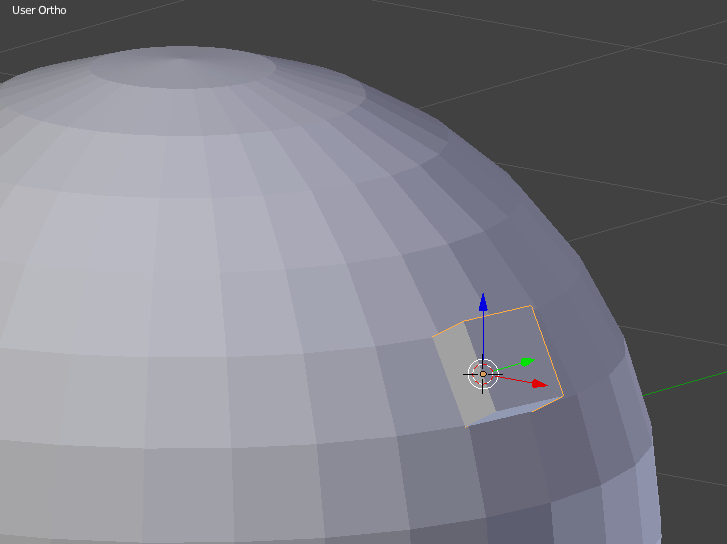 |
| Figure 5 |
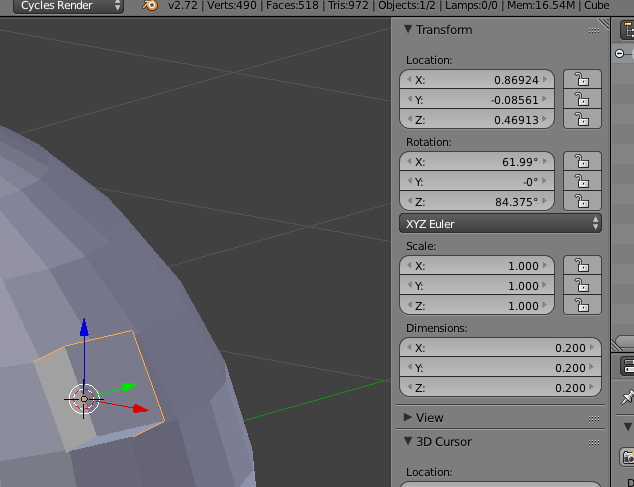
If you check the cube's Transform values in the Properties panel, you'll see it has the same location and rotation as the selected face (Figure 6).
 |
| Figure 6 |
Now, deselect everything. Select the sphere and then the cube. Press Control-J to join them into one mesh. The selection order is important, because we are joining the sphere to the cube, not the other way around. This way, we are preserving the cube's funky rotation and position. All you need to do now is press Option-G and Option-R to clear the object's rotation and location. The sphere-cum-cube is aligned perfectly so that the selected face is facing squarely up in the Z axis (Figure 7).
 |
| Figure 7 |
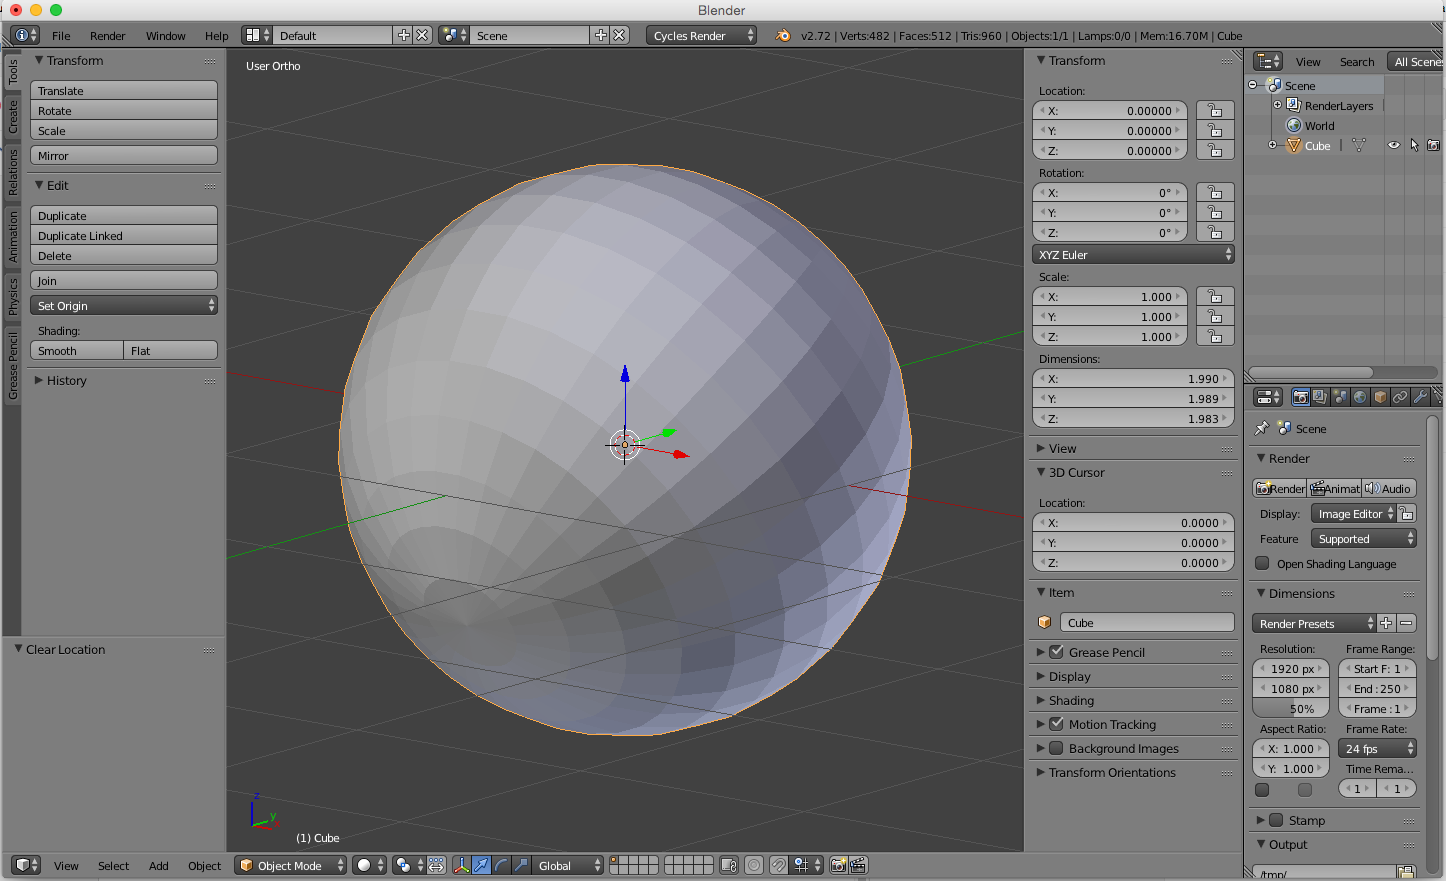
Finally, go into Edit mode, select the cube, and delete it. Go back into Object mode, press Shift-Control-Option-C, choose Origin to Center of Mass, and press Option-G again to clear its position and place it on the world origin (Figure 8). We are done!
 |
| Figure 8 |
Thursday, September 25, 2014
Tea Bottle Studio Render
I am showing here a render of a commercial piece I worked on a while ago, with some modifications—the label has been replaced with one of my own invention. For those interested, it reads matcha, the word in Japanese for green tea.
Readers of this blog may already know of my predilection for rendering anything glass and liquid. Some examples are here and here. For the tea in the bottle, originally I had used Blender Diplom's absorption node trick. Since the last time I worked on this piece, volume absorption support was added to Cycles, so I changed the setup to the much more straightforward shown on image 1. I will be playing around with volume very soon, it's a great feature for sure :)
As for the scene setup, I am showing here a screenshot of what it looks like. It's nothing too fancy: just a few lights an a studio backdrop. I love how Cycles lets you see the studio setup as a rendered image, it looks awesome!
 |
| Image 1. Green tea studio shot, with some condensation drops to add a bit more interest. |
Readers of this blog may already know of my predilection for rendering anything glass and liquid. Some examples are here and here. For the tea in the bottle, originally I had used Blender Diplom's absorption node trick. Since the last time I worked on this piece, volume absorption support was added to Cycles, so I changed the setup to the much more straightforward shown on image 1. I will be playing around with volume very soon, it's a great feature for sure :)
 |
| Image 2. To add absorption to glass, simply connect a Volume Absorption node to the Material output Volume socket. It is just awesome! |
 |
| Image 3. Cycles lets you see exactly what your scene looks like, even from far away. It's weird, but nice :) |
 |
| Image 4. Who can read a wireframe, anyway? |
Saturday, September 13, 2014
Cycles Workshop near Barcelona
This coming Friday, September 19th, as part of Dia de la llibertat del programari (Software Freedom Day,) organized by the open source advocate group Konfraria, in Palma de Cervelló, Catalonia, I will be teaching a free, two-hour long workshop on creating materials with Cycles.
This workshop is aimed at (non-raw) beginners and intermediate users of Blender, and will be taught in Catalan. I will be covering the fundamentals of Cycles, from a quick semi-technical explanation of what it is (an unbiased ray tracer) and what it can do (awesome stuff!) to a quick overview of its main features, such as its nodal workflow, render settings, and compositing-friendly capabilities. I encourage all attendees to bring their own laptops in order to better follow all the steps, and reproduce the results. I recommend that all attendees have the latest version of Blender installed, and strongly urge that you install the Node Wrangler (Node Efficiency Tools) add-on. Although, starting with the 2.71 version, it comes with Blender by default, just in case, here is the link to download it.
After a quick overview, I will talk about what a material is in the 3D rendering world, and how to approach the creation of materials so that they do what we need them to do, considering matters of time constrictions, production, in addition to subjective considerations.
The third part of the workshop will center around the creation of some of the basic materials. We will be going over how to create a basic mix shader, and how to use the Factor socket. After that, we will cover two-sided materials, placing decals, reusing and organizing materials, and finally the creation of a complex wood floor material.
____________________________
Resum del taller
Introducció
Cycles és, com Blender mateix, una eina en constant evolució, i intentar explicar-lo en un taller de dues hores és pràcticament impossible. Aquí ens concentrarem en aprendre a crear materials bàsics amb Cycles i tenir una idea de com se’n poden generar de més complexos.
Abans de començar seria interessant saber quin nivell de coneixements sobre Cycles i Blender tenen els assistens.
També, parlarem sobre què és un material. Es podria concebre com una interpretació subjectiva de la percepció de la superfície i el volum d’un objecte, de com es reflecteix la llum, i de quines característiques geomètriques en són d’importància.
No existeix cap material “tot terreny”. Els materials s’han de recolzar i depenen de la il·luminació, la geometria de l’objecte, la il·luminació global i els ajustos de renderitzat, entre altres.
Eines utilitzades
-Node Wrangler (Efficiency Tools). Ensenyar el funcionament de Control+Shift+Click (Preview node) i el de Shift+S (Switch node)
-Cycles addon, of course :)
Fonaments de Cycles
Què és Cycles?
Cycles és un unbiased renderer. És el que es diu un ray tracer render engine, generalment oposat a un path tracer, que introdueix un error (bias) que serveix per resoldre el “high frequency noise”. Cycles afecta tot el funcionament de Blender a molts nivells. Entre altres coses, permet treballar amb diferents render passes per compositing, ofereix previsualitzacions a temps real en el 3D viewport, i conté tota una sèrie d'eines específiques pel renderitzat eficient i el control de la càmera i la il·luminació.
Tipus de materials
-Material (Surface, Volume, Displacement)
-Lamp
-World
Nodes
-La correlació entre un workflow on s'utilitza la interfície principal i el nodal interface.
-Els colors dels sockets (endolls) dels nodes i la seva importància.
-La normalització dels valors (blanc i negre).
-Utilitzem el Viewer node (Control+Shift+Click) per veure quin efecte té el node en qüestió.
Creació de Materials
-Plàstic
Barrejar un Glossy amb un Diffuse amb un Layer Weight (Fresnel o Facing) com a factor.
-Materials diferents en cada cara
Com utilitzar el node Geometry per controlar què es veu i què no. Comparar aquest node amb el de Light Path, i amb les funcions de Ray Visibility en l’object tab del Properties panel.
-Col·locar una enganxina en un objecte
La utilització dels UV maps i els nodes necessaris per mapejar una imatge correctament. Nodes utilitzats: Texture Coordinate, Attribute, UV Map, conjuntament amb la creació de UV maps addicionals.
-Reutilitzar els materials
Grups de nodes per organització i reutilització.
-Crear un parquet procedural (exercici difícil)
Mirarem exemples i cadascú que ofereixi la seva solució.
Recursos externs essencials pels que vulguin endinsar-se en la creació de materials amb Cycles.
-CGTextures
-Good Textures
-Manual de Blender
-Blender Cookie
-Blender Guru
-Blender Diplom
This workshop is aimed at (non-raw) beginners and intermediate users of Blender, and will be taught in Catalan. I will be covering the fundamentals of Cycles, from a quick semi-technical explanation of what it is (an unbiased ray tracer) and what it can do (awesome stuff!) to a quick overview of its main features, such as its nodal workflow, render settings, and compositing-friendly capabilities. I encourage all attendees to bring their own laptops in order to better follow all the steps, and reproduce the results. I recommend that all attendees have the latest version of Blender installed, and strongly urge that you install the Node Wrangler (Node Efficiency Tools) add-on. Although, starting with the 2.71 version, it comes with Blender by default, just in case, here is the link to download it.
After a quick overview, I will talk about what a material is in the 3D rendering world, and how to approach the creation of materials so that they do what we need them to do, considering matters of time constrictions, production, in addition to subjective considerations.
The third part of the workshop will center around the creation of some of the basic materials. We will be going over how to create a basic mix shader, and how to use the Factor socket. After that, we will cover two-sided materials, placing decals, reusing and organizing materials, and finally the creation of a complex wood floor material.
____________________________
Resum del taller
Introducció
Cycles és, com Blender mateix, una eina en constant evolució, i intentar explicar-lo en un taller de dues hores és pràcticament impossible. Aquí ens concentrarem en aprendre a crear materials bàsics amb Cycles i tenir una idea de com se’n poden generar de més complexos.
Abans de començar seria interessant saber quin nivell de coneixements sobre Cycles i Blender tenen els assistens.
També, parlarem sobre què és un material. Es podria concebre com una interpretació subjectiva de la percepció de la superfície i el volum d’un objecte, de com es reflecteix la llum, i de quines característiques geomètriques en són d’importància.
No existeix cap material “tot terreny”. Els materials s’han de recolzar i depenen de la il·luminació, la geometria de l’objecte, la il·luminació global i els ajustos de renderitzat, entre altres.
Eines utilitzades
-Node Wrangler (Efficiency Tools). Ensenyar el funcionament de Control+Shift+Click (Preview node) i el de Shift+S (Switch node)
-Cycles addon, of course :)
Fonaments de Cycles
Què és Cycles?
Cycles és un unbiased renderer. És el que es diu un ray tracer render engine, generalment oposat a un path tracer, que introdueix un error (bias) que serveix per resoldre el “high frequency noise”. Cycles afecta tot el funcionament de Blender a molts nivells. Entre altres coses, permet treballar amb diferents render passes per compositing, ofereix previsualitzacions a temps real en el 3D viewport, i conté tota una sèrie d'eines específiques pel renderitzat eficient i el control de la càmera i la il·luminació.
Tipus de materials
-Material (Surface, Volume, Displacement)
-Lamp
-World
Nodes
-La correlació entre un workflow on s'utilitza la interfície principal i el nodal interface.
-Els colors dels sockets (endolls) dels nodes i la seva importància.
-La normalització dels valors (blanc i negre).
-Utilitzem el Viewer node (Control+Shift+Click) per veure quin efecte té el node en qüestió.
Creació de Materials
-Plàstic
Barrejar un Glossy amb un Diffuse amb un Layer Weight (Fresnel o Facing) com a factor.
-Materials diferents en cada cara
Com utilitzar el node Geometry per controlar què es veu i què no. Comparar aquest node amb el de Light Path, i amb les funcions de Ray Visibility en l’object tab del Properties panel.
-Col·locar una enganxina en un objecte
La utilització dels UV maps i els nodes necessaris per mapejar una imatge correctament. Nodes utilitzats: Texture Coordinate, Attribute, UV Map, conjuntament amb la creació de UV maps addicionals.
-Reutilitzar els materials
Grups de nodes per organització i reutilització.
-Crear un parquet procedural (exercici difícil)
Mirarem exemples i cadascú que ofereixi la seva solució.
Recursos externs essencials pels que vulguin endinsar-se en la creació de materials amb Cycles.
-CGTextures
-Good Textures
-Manual de Blender
-Blender Cookie
-Blender Guru
-Blender Diplom
Thursday, July 31, 2014
New Beginner's Seminar—Creating Materials with Cycles

Sunday, April 21, 2013
Creating a Book Cover Illustration in Cycles
This coming April 23rd is a special day in Catalonia — it is Saint George's Day. According to legend, Saint George slay the dragon to save a damsel from being eaten by the dragon. According to some versions of the story, out of the dragon's blood a rosebush grew. Also, as it happens, April 23rd commemorates the deathday of two famous writers — Shakespeare and Cervantes. So, in Catalonia, for Saint George's day, it has become traditional to exchange roses and books.
As a way to celebrate Saint George's day, I have decided to jump-start my blog once more, which I've really had quite abandoned for the last few months. Today I will go over the production of a cover illustration which I created a few month ago for Elizabeth Castro's book, What's up with Catalonia? (figure 1).
 |
| Figure 1. I used Blender and Cycles, almost exclusively, to create this illustration. This is a low-rez version of the final image. |
 |
| Figure 2. This is what the final cover looks like. |
Without further ado, I want to delve into a few of the technical details in the Blender file I used. First, I want to show a screenshot of the whole scene, to give a sense of how simple it really was to set up. Of course, simplicity is the result of long hours of eliminating unwanted fluff :)
 |
| Figure 3. The scene contains a camera, two light emitting planes, a floor with a texture, and a few objects, some of which were recycled from an old scene of mine. The parchments, which show some text from the United States Declaration of Independence, were created specially for this illustration. |
To model and texture the parchments I used two workflows which I find absolutely essential. The first, at the modeling stage, is the use of the Subdivision Surface and Displace modifiers (in that order) to produce irregular, organic surfaces. Each parchment is nothing more than a plane with a couple of extrusions and a bit of vertex tweaking. Here is a screenshot of one of them in Edit mode, so you can see how easy it was to model them:
 |
| Figure 4. A plane, with a couple of extrusions and a bit of tweaking of vertices. The outside edges all have a 1.0 Crease value, which can be assigned either by pressing N to access the Properties panel and entering a number in the Mean Crease field, or by pressing Shift-E to access this function on the fly. |
 |
| Figure 5. The same plane with the Subsurf and Displace modifiers. For the Displace modifier, I just used the built-in Clouds texture with close to default settings. |
 | |
|
 |
| Figure 7. Click to enlarge the image. Oodles of noodles! |
A final detail worth mentioning is that I used a mix between Transparent and Diffuse shaders, controlled by an image texture, to produce the worn-out edges of the parchments.
Monday, January 14, 2013
Hair in Cycles—My First Tribbles
I have been playing around with the new hair capabilities implemented in Cycles recently, and it's a lot of fun! One of these days I'll probably talk about how to use the Hair Info node, which provides a lot of flexibility with shading hair strands. Anyway, here are my first tribbles. Enjoy!


Subscribe to:
Posts (Atom)